Category: Barbecue

Stuffed Boneless Pork Loin Roast


Stuffed Boneless Pork Loin Roast

1 center cut boneless pork loin roast ~3.5 lb.
1 med. apple (Gala, Granny Smith), diced
1/2 cup diced onion
1 cup pecan halves, chopped
3 slices bacon, cooked crispy, diced
2-3 oz. fresh mushroom slices, chopped
3 cloves garlic, minced
1/2 t. dried rosemary, ground
1 C. breadcrumbs
1/2 C. apple sauce

3 T. butter or margarine
salt & pepper
1 C. Diamond Crystal kosher salt
10-12 ft. kitchen twine

24 hours in advance, brine pork loin roast in kosher salt dissolved in 1 gallon cold water, in a non-reactive container. Refrigerate.

Saute onion in butter until translucent. Add apple, bacon, mushroom, pecans, rosemary and cook until apple just begins to soften. Mix together apple sauce and breadcrumbs. Reduce heat to low and add garlic and breadcrumb/apple sauce mixture, combining thoroughly with other ingredients. Remove stuffing to bowl, and place in freezer or refrigerator to cool to refrigerator temp.

Remove pork loin from brine, rinse and pat dry. Place roast on cutting board fat cap down, noting which side is the more tapered. Orient roast so the tapered side is toward your cutting hand. Using sharp knife, cut lengthwise along the roast with knife blade held flat about 3/4″ above the cutting board. Carefully continue to cut, “unrolling” roast as you go, so that you end up with a mostly flat, rectangular piece of meat about 3/4″ thick overall. Thicker parts may be flattened with a meat mallet. Salt& pepper both sides of meat. If stuffing mix is not yet cold, roll up and return meat to refrigerator until time to continue.

Pre-heat oven to 325°.

Unroll meat onto cutting board and spread stuffing mixture evenly, leaving about a 1/2″ border all around, a little more like 1.5″ on the edge that was originally inner most part of roast. Roll up, being careful not to apply too much pressure and force stuffing out. Stuffed roast should end up fat cap up, and seam side down.

Using butcher’s twine, truss roast at about 1″ intervals. Run excess twine down and back through bottom of each loop, then up to knot at top of first loop, and secure. This sounds harder than it is, but once you do it, it’s quite simple.

Place roast in large pre-heated skillet, and sear on all sides. Place roast seam side down on rack in roasting pan, and cook until meat thermometer reads 140° in center of roast, about 75 minutes. Remove from oven and rest, covered loosely with sheet of foil. Residual heat will continue to cook, and internal temperature should rise to 145-148. This temperature range is considered completely and safely cooked for today’s pork products.

Photo of final product below.

My original intent was to smoke roast on the smoker using apple and pecan woods for smoke flavor. When I went out to light the charcoal, it started to drizzle, and I just wasn’t in the mood to get wet, since my smoker umbrella was ruined in Gustav. I also ended up making french fries out of butternut squash instead of the roasted root vegetables I had originally planned.

This stuffing represents only one of many possible combinations one might use. Part of it was planned (apple, onion, pecan, breadcrumbs); part was just stuff I happened to have on hand (mushrooms, bacon, garlic, apple sauce).
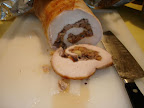
Dsc00458a.jpg

ABTs


ABT = Atomic Buffalo Turds. Once you get past the name– I didn’t make this one up– a great appetizer you can make in your Bullet or other smoker. Made with fresh jalapeno peppers, cream cheese and leftover BBQ meat. Although typically made using pulled pork, I did an ABT variation Christmas day using leftover pastrami instead.

Process 8 oz. Whipped Philly Cream Cheese and 1/4 pound diced pastrami together in a food processor. Stuff 24 fresh jalapeno pepper half-shells (12 peppers de-stemmed, sliced lengthwise, and de-seeded) with a liberal tablespoon or more of the cream cheese/meat mixture. Wrap each in a half-slice of thin bacon secured with a soaked toothpick. Smoke with one chunk of cherry or other mild smoke wood for 90 minutes at 225°. Great hot, or even cold after refrigeration.

Smoked Mushroom Dip


We used to pay through the nose at a local high-end grocery for a smoked mushroom dip like this one. It’s darn tasty, and I knew I could duplicate it. Already having a smoker helps.

Doug’s Smoked Mushroom Dip

8 oz. sliced fresh mushrooms, smoked*
12 oz. Whipped Philly Cream Cheese
8 oz. Sour Cream
1/8 t. garlic powder
1 t. onion flakes, ground
1 t. kosher salt
2-3 T. pine nuts, finely chopped
fresh ground black pepper

2 small chunks hickory wood

*Butter a small 10″x14″ baking pan, and spread mushroom slices out in a single layer. Add fresh ground pepper to suit. Place in 235-250° smoker, add smokewood, and smoke for 75-90 minutes. The slices should be cooked, but still slightly firm. Remove and allow to cool. (During a rib cook, I set the pan on top of some foiled ribs, and just threw the wood on top of the coals.)

Chop smoked mushroom slices coarsely (1/4″ – 1/2″ pieces). In a 6 cup bowl, add sour cream, garlic powder, onion, salt, and pine nuts, mixing thoroughly. Add chopped mushrooms and cream cheese, folding together until well mixed. Refrigerate and allow flavors to combine for at least a few hours.

For a thicker, chunkier dip, reduce sour cream to either 4 or 6 ounces, starting with 4 and adding as desired. I like to use 4 ounces.

Pork Butt Redux

Posted by April 13, 2004

I am beginning to think pork butt is replacing pastrami as my favorite thing to do on the Bullet. Although I enjoy the process of making my own authentic pastrami from scratch, the results of pork shoulder being smoked low & slow for 12-13 hours to a state of tender succulence are beyond compare.

I had a conversation with my neighbor last week about doing a communal cook. You see, I had a pair of mourning doves nest in a potted aloe plant on my patio in March, and, in order to minimize disturbing them, I had to move the cook site over to the other side of the house– right next to my neighbor’s side door. During our talk, I realized I had been torturing him and his family with the aromas of good barbecue for a month. I suggested that, since I am frequently only cooking on one grate, that the other was free for whatever he wanted to supply. He agreed and said perhaps he would purchase something for the next cook.

The following Saturday, I went to Sam’s and requested a “two pack of pork butts in Cryovac”. The meat department guy said, “Oh, you want a whole one?” I just nodded yes, and he went in the back. I saw him weigh one up and refer to his laminated book for pricing. He returned with a pack weighing 13.5 pounds priced at $1.08 per pound– not bad, and better than $1.58 per pound for the singles in styro trays out front. The “use or freeze by” date was over 10 days away to boot.

The next day being Easter Sunday, I wanted to get the butt cook out of the way because I also had turkey breast to do, by request of an Easter dinner guest.

I got the Bullet fired up, and put the butts on at 11am, figuring that, at 5.75 and 6.75 pounds respectively, I would be looking at 12-13 hours. The temperature held rock steady at 250* the entire time, and, at 10pm, the smaller butt was ready.

I decided to surprise my neighbor, and, knowing they keep late hours next door, phoned him.

“Have I tortured you long enough? Your pork is ready. I’m bringing it over.” He said OK and, armed with a jar of rub and some vinegar-based sauce, off I went.

We gathered in the kitchen and the butt was ceremoniously unfoiled, releasing that fabulous aroma. The bone came out effortlessly. I requested two carving forks, and went at it. In minutes, we had a pan full of beautiful pulled pork. I sprinkled on some rub and mixed it in. I then gave a short tutorial on the merits of vinegar-based sauces on pulled pork, and storage and reheating techniques as we all tried some samples.

My neighbor asked what did he owe me. I said, “It’s like drugs– the first taste is free.” He laughed, and agreed that he was already “hooked”, saying he would grab a two pack from Sam’s for next week.

Pork Butt Roast


It’s been quite a while since I did a pork butt roast. I usually do what is called a small or a half, typically around 4 lbs. I wanted to try to go all out and do a bigger one, and, for my household, a 7-pounder seemed about the right size to try.

A Weber Bullet owner knows his cooker is capable of not only very stable temperatures, but of maintaining them for very long time periods as well. Knowing this, a lot of Weber Bullet owners cook pork butts overnight, because, at barbecue temperatures, pork butt takes 1-1/2 to 2 hours per pound to reach the desired internal temperature of 190 to 205*F. Doing a little math, we realize that a 7 pound pork butt roast should take from 10-1/2 to 14 hours to finish.

Those unfamiliar would ask “Why so high a temperature? Pork is considered cooked well below 190*F.”

This is where we have to remind the casual observer that the aim of true barbecue is to take otherwise tough and/or fatty cuts of meat and, by cooking them at low temperatures for long periods of time, render out fat and break down tough connective tissue. Barbecue meats need to be cooked– it is said– beyond doneness to the point of tenderness.

In this case, I wasn’t interested in an overnighter, because I was not shooting to be done for a specific dinner time. Instead, I chose to get started right after Sunday breakfast– around 10:00am.

I opted to fire up the cooker using an alternate method known for maintaining long, even burn times. To accomplish this, the charcoal ring is filled full of unlit briquets, and a small amount of lit charcoal is placed on top. This small amount then slowly ignites adjacent briquets, and, eventually, the entire bed is lit– just not all at once. Some would question the advisability of cooking over charcoal that has not been fully lit, but this method in fact does not taint the food with any undesirable taste.

For my starter coals, I chose to re-light some used briquets from a previous cook. I know from experience that these used briquets burn hotter than new charcoal, and I theorized that such hotter-burning coals would be particularly suited for getting the cooker temperature up to target more quickly.

Those familiar with good barbecue are acquainted with the concept of a smoke ring, which is the reddish coloration the edge of the meat takes on when smoke-cooked. A chemical reaction takes place, but only within a specific temperature range, and then stops once the high end of the range has been exceeded, which explains why this “ring” only penetrates the meat a fraction of an inch. Therefore, in order to form a pronounced smoke ring, one must apply smoke to the meat while it is in this specific temperature range, between 40 and 140*F.

Some observers familiar with true barbecue would ask, “If you’re going to do a long cook like a pork butt, why not let the meat come to room temperature before cooking, like I’ve heard some people do?” My answer would be two-pronged. One, you would not want to let raw meat sit off refrigeration for too long due to food safety concerns. Second, even if you set a sizeable pork butt roast out for a couple of hours, the mass of the meat would not allow its core temperature to rise appreciably.

Another thing barbecue cooks know is that, when a large piece of meat is placed into a hot cooker, the temperature will drop considerably because of the cold mass introduced into the chamber. To address this issue, I decided to try something different.

Typically, the firing and set-up of a Weber Bullet or similar cooker involves lighting the fire by some method, and also introducing a temperature-stabilizing heatsink. In the case of the Bullet, the standard heatsink is the water-filled pan below the cooking grates.

Some Bullet owners, in a effort to avoid spilling water on hot coals or to facilitate clean-up, have switched to using sand in the pan. There is some debate as to whether sand is better than water as a heatsink or not. The pro-sand camp cite the reasons just stated, adding that sand– unlike water– does not need to be replenished like water does. The traditional water camp, however, would point out that sand continues to absorb heat far past the 212* point water does, and it (sand) can therefore become an undesirable radiator of heat over time.

So, my different approach for this cook went like this: I wanted to put the meat on right out of the refrigerator to maximize the smoke ring. But, I didn’t want to fight to get the cooker temperature up to my target any longer than I had to. So, I theorized that, if I began cooking with no heatsink, the overall mass available to absorb heat initially would be limited to only the meat itself. My plan was to leave the pan empty until the cooker temperature had come reasonably close to my target, and then add very hot tap water to the pan.

Long story short, it worked perfectly. Even cooking on a cold 57* day, with light wind, my cooker hung at a stable 250* for 13 hours, with fuel to spare.

Once I reached 150* meat temp, I foiled the roast since I knew it had received plenty of smoke, and was past the point of further smoke ring formation. Once the roast hit 198*, I pierced a few holes in the bottom of the foil to let rendered fat drain into the water pan. I continued to cook until I achieved a final meat temperature of 205*.

Once remove from the cooker, I rested the still foil-wrapped roast for about 15 minutes. Upon unwrapping, the bone pulled cleanly from the meat with no resistance whatsoever. I used two carving forks to easily shred the still very hot meat into pulled pork. The net from the 7.17-pound roast weighed right at 4 lbs.

BBQ Meat: Price vs. Value


I find fascinating the wide range of meat prices you can find from store to store on any given Sunday. Of course, there are considerations like USDA grades, amounts of trimming, and prevailing price levels due to other factors, but, all too often, more attention is paid by the consumer to price rather than to value.

Here’s a little math I did based on the three racks of spares I did recently:

Rack #–Price/lb.–Wt.—–Net Wt. After Trimming

1——-$1.69——3.97—-2.06

2——-$1.69——4.21—-2.12

3——-$2.29——3.62—-1.81

Yes, literally half of each pack’s weight was trimmings and scraps packed underneath the racks, in addition to what I removed. So, for each of these trimmed-to-St. Louis-style racks, I ultimately paid $3.26, $3.35, and $4.58, respectively, per pound for the privilege of trimming them myself.

This week, I took a closer look at the spares at the high-end grocery I frequent for the extensive wine selection– they had already-trimmed spares on sale for $2.79/lb, and no scraps or breast bones buried under the racks in the packs. Here’s what I got— no more, no less. Think I’ll stock up.